Jansen's Linkage - "3. Methodology"
- Moojo Kim
- 2020년 9월 26일
- 2분 분량
최종 수정일: 2020년 9월 28일

NITK Surathkal, 2016
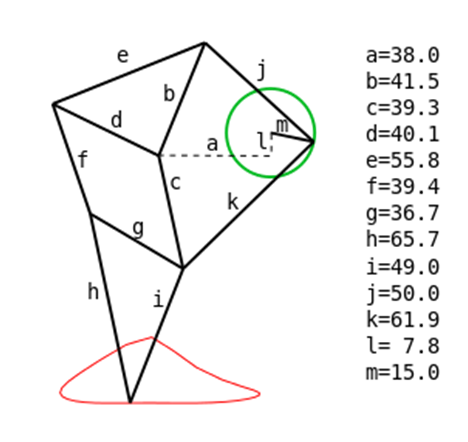
1. Label 14 popsicle sticks with numbers indicating relative lengths as shown above, and plot two points on each popsicle stick, the number on the stick being the distance, in mm, between them. Use a vernier caliper to accurately measure the distance.

2. Attach a 2.4 mm drill to the electric drill, and make a hole on where the plotted dots are. Cut the side of the stick that has a straight end into a two sided pointer.

3. Round the edges of the two sided pointers into a round texture. After this, 14 sticks with round edges and two holes will be left.

4. Connect the sticks by linking them with toothpicks. For sticks that make up the static triangles on the top and bottom, bond them to the toothpicks by using instant adhesive glue. For those that are supposed to move freely such as the P5–P7 links, let them loose by enlarging the size of the holes if either the toothpicks are too thick or the holes are too small.

5. Connect the 14 sticks to together, and attack the central crank link to the DC motor. This DC motor is linked to a motor driver that is controlled by the Arduino Uno Board. The circuit for this is on step 6.

6. Connect the wires to the Arduino Uno Board as follows: GND to GND, VCC to 5V output, A-IB to pin 5, A-IA to pin 6, the positive terminal of the motor to the left terminal of MOTOR-A, and the negative terminal of the motor to the right terminal of MOTOR-A.

7. Code the Arduino Uno Board for the user to be able to control the direction and speed of the DC motor by inputing numbers on the Serial board. For example, the input "1 1023" will spin the DC motor forwards at maximum speed, and the input "2 300" will spin the DC motor backwards at relatively slow speed.

Bibliography
NITK Surathkal. “Jansen Linkage Model.” Virtual Labs, NITK Surathkal, 2016, mm-nitk.vlabs.ac.in/exp25/index.html.


댓글